このビーコンを製品に取り付け、その信号を取得・処理することでほぼリアルタイムに商品の在庫を把握することができます。以下のシステム図は 、Raspberry Pi と呼ばれる超小型Linux機(価格は約3000円/台)を広い倉庫内に万遍なく配置、ビーコン信号を漏れなく取得し、データベースの在庫テーブルを更新するというものです。
入出庫システムからは独立して、在庫数の把握が可能となります。
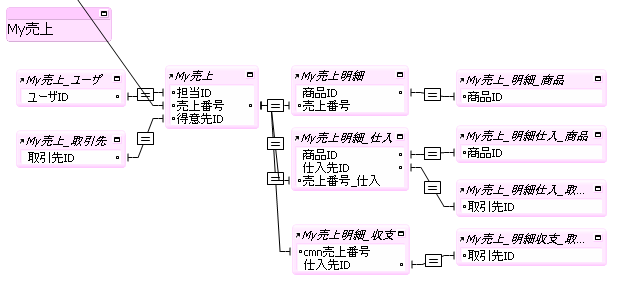
FileMaker Pro 7 以降に導入されたリレーションシップグラフでは、テーブルを別名、または同一名で定義して配置できます。
たとえば「商品」というテーブルは、リレーションシップグラフ上では「商品Table1」、「商品テーブル」、「商品」など自由に名前をつけて配置したり、同一のテーブルを別名で複数配置したりできます。
1. Visual Studio 2010 を起動し、トップ画面の一番上に表示される Connect to Team Foundation Server (Team Foundation Server に接続) をクリックするか、メニューバーより、「Team」→「Connect to Team Foundation Server」を選択します。
2. Connect to Team Project (チームプロジェクトに接続)というダイアログが表示されます。 初回起動時は接続可能な Team Foundation Server が未登録の状態ですので、サーバを登録する必要があります。 “Servers...”をクリックします。
3. Add/Remove Team Foundation Server (Team Foundation Server の追加と削除)というダイアログが表示されますので、“Add...”(追加)をクリックします。
4. Team Foundation Server がインストールされているサーバの URL、または Team Foundation Server の名前を入力し、“OK” をクリックします。
5. 上記で登録した Team Foundation Server への接続が行われ、Connect to Team Project (チームプロジェクトに接続) というダイアログに、利用可能なチームプロジェクトの一覧が表示されます。
FileMaker Pro 11 で開発し、今年1月にリリースした『売上猫くん on MySQL R5.0β』を使用。 さらに今回のテストのため、本製品のAccess版を作成した。 といっても、機能は売上・請求機能に限定し、その機能のいくつかも削られたプロトタイプとなっている。 システム構成は以下の通り。
We have been testing WordPress 3.2.1 and found out that it would not upload any image files.
You may end up with the following error or something similar when you try to upload an image: Unable to create directory *********/wp-content/uploads. Is its parent directory writable by the server?
This error occurs when you have not given the IUSR account write-access to uploads directory.
You may be able to fix this problem with the following steps: (Note: we assume that the PHP environment is properly set up, so the detailed instructions on php.ini settings are not mentioned here.)
1. Make sure a folder named uploads exists in wp-content.
This directory is oftentimes not automatically created in the IIS environment, so you may have to create it on your own.
2. Right-click on uploads directory to bring up Security tab. Add IUSR to the user list and assign write-access to it.
3. Now, go back to the WordPress media settings and make sure if the URL for file uploads is wp-content/uploads.
1. NAS の電源を落とす。 2. 破損したディスクを取り外す。 3. NAS の電源を入れ、残ったディスクが正常に動作していることをログとシステム状態で確認する(下図参照)。 4. NAS の電源が入ったままで新しいディスクを実装する。すると、自動的に RAID の再構築が行われるので、再構築が始まっていることを確認(下図参照)。 5. 再構築が終われば利用可能。
本ブログでは、Hyper-V の仮想マシンに OS をインストールしたり、仮想マシンを別のコンピュータの仮想マシンとして移行したりする方法を紹介してまいりましたが、今回は、運用中の物理マシン(タワー型マシン)の環境をごっそり仮想マシンに変換(P2V)して、Hyper-V で運用する方法について紹介します。
手順は次の 3 ステップとなります。
1. 物理マシンのドライブをそれぞれ仮想ハードディスク(.vhd)に変換する。
MicroSoft 社の Windows SysInternals で提供されている disk2vhd というツールを使うことによって、物理ドライブを仮想ディスクに変換する。
注意:Hyper-V で運用可能な仮想ディスクを作成する場合は、ダイアログボックス右上の [Prepare for use in virtual PC]というチェックボックスに必ずチェックを入れてください。